
10.6.2. Using CMake with LAMMPS
CMake is the recommended way of building LAMMPS, and it has been
supported since 2018 thanks to the efforts of Christoph Junghans (LANL)
and Richard Berger (LANL). The legacy build system
based on GNU make is slated for retirement. One of the key strengths of
CMake is that it is not tied to a specific platform or build system.
Instead it generates the files necessary to build and develop for
different build systems and on different platforms, e.g. makefiles for
the make program, files for the faster ninja build tool, or
project files for integrated development environments (IDE) like Visual
Studio or Xcode. Several other IDEs, e.g. Visual Studio Code, Qt
Creator, or CLion, can read the CMake configuration files directly.
A second important feature of CMake is that it can detect and validate available libraries, optimal settings, available support tools and so on, so that by default LAMMPS will take advantage of available tools without requiring to provide the details about how to enable/integrate them.
The downside of this approach is, that there is some complexity associated with running CMake itself and how to customize the building of LAMMPS. This tutorial will show how to manage this through some selected examples. Please see the chapter about building LAMMPS for descriptions of specific flags and options for LAMMPS in general and for specific packages.
Changed in version TBD.
CMake can be used through either the command-line interface (CLI)
program cmake, a text mode interactive user interface (TUI)
program ccmake, or a graphical user interface (GUI) program
cmake-gui. All of them are portable software available on
all supported platforms and can be used interchangeably.
The minimum required CMake version is currently 3.27.
All details about features and settings for CMake are in the CMake online documentation. We focus below on the most important aspects with respect to compiling LAMMPS.
Prerequisites
This tutorial assumes that you are operating in a command-line environment using a shell like Bash or Zsh.
Linux: any Terminal window will work or text console
macOS: launch the Terminal application
Windows 10 or 11: install and run the Windows Subsystem for Linux
other Unix-like operating systems like FreeBSD
Note
It is also possible to use CMake on Windows 10 or 11 through either the Microsoft Visual Studio IDE with the bundled CMake or from the Windows command prompt using a separately installed CMake package, both using the native Microsoft Visual C++ compilers and (optionally) the Microsoft MPI SDK. Please see the page on building LAMMPS on Windows for details. This tutorial, however, only covers Unix-like command-line interfaces.
We also assume that you have downloaded and unpacked a recent LAMMPS source code package or used Git to create a clone of the LAMMPS sources on your compilation machine.
You should change into the top-level folder of the LAMMPS source tree; all paths mentioned in the tutorial are relative to that. Immediately after downloading it should look like this:
$ ls
AGENTS.md     codemeta.json  lib         README       tools
bench         doc            LICENSE     SECURITY.md  unittest
CITATION.cff  examples       potentials  src          update-codemeta.sh
cmake         fortran        python      third_party
Build versus source folder
When using CMake the build procedure is separated into multiple distinct phases:
Configuration: detect or define which features and settings should be enabled and used and how LAMMPS should be compiled
Compilation: generate and compile all necessary source files and build libraries and executables.
Installation: copy selected files from the compilation into your file system, so they can be used without having to keep the source and build tree around.
The configuration and compilation of LAMMPS has to happen in a dedicated
build folder which must be different from the source folder. Also
the source folder (src) must remain pristine, so it is not allowed
to “install” packages using the traditional make process and after a
compilation attempt all created source files must be removed. This can
be achieved with make no-all purge in the src folder.
You can pick any folder outside the src folder. We recommend to
use a folder build in the top-level folder, or multiple folders in
case you want to have separate builds of LAMMPS with different options
(build-parallel, build-serial) or with different compilers
(build-gnu, build-clang, build-intel) and so on. CMake will
create the build folder, if needed. All the auxiliary files created by
one build process (executable, object files, log files, etc) are stored
in this folder or in folders within it that CMake creates.
Running CMake
CLI version
From the top-level folder, we now run the command cmake -S cmake -B
build. The -S flag points to the folder with the CMake scripts
for LAMMPS (the cmake folder) and the -B flag selects the build
folder. This will start the configuration phase and you will see the
progress of the configuration printed to the screen followed by a
summary of the enabled features, options and compiler settings. A
typical summary screen will look like this:
$ cmake -S cmake -B build
-- The CXX compiler identification is GNU 15.3.1
-- The C compiler identification is GNU 15.3.1
-- Detecting CXX compiler ABI info
-- Detecting CXX compiler ABI info - done
-- Check for working CXX compiler: /usr/bin/c++ - skipped
-- Detecting CXX compile features
-- Detecting CXX compile features - done
-- Detecting C compiler ABI info
-- Detecting C compiler ABI info - done
-- Check for working C compiler: /usr/bin/cc - skipped
-- Detecting C compile features
-- Detecting C compile features - done
-- Running check for auto-generated files from make-based build system
-- Found ZLIB: /usr/lib64/libz.so (found version "1.3.1")
-- Found MPI_CXX: /usr/lib64/mpich/lib/libmpicxx.so (found version "4.1")
-- Found MPI: TRUE (found version "4.1") found components: CXX
-- Looking for C++ include omp.h
-- Looking for C++ include omp.h - found
-- Found OpenMP_CXX: -fopenmp (found version "4.5")
-- Found OpenMP: TRUE (found version "4.5")
-- Found JPEG: /usr/lib64/libjpeg.so (found version "62")
-- Found PNG: /usr/lib64/libpng.so (found version "1.6.37")
-- Found ZLIB: /usr/lib64/libz.so (found version "1.2.11")
-- Performing Test COMPILER_SUPPORTS-ffast-math
-- Performing Test COMPILER_SUPPORTS-ffast-math - Success
-- Performing Test COMPILER_SUPPORTS-march=native
-- Performing Test COMPILER_SUPPORTS-march=native - Success
-- Looking for C++ include cmath
-- Looking for C++ include cmath - found
-- Generating style headers...
-- Generating style source files...
-- Generating package registry...
-- Generating lmpinstalledpkgs.h...
-- Found Git: /usr/bin/git (found version "2.55.0")
-- Found Python3: /usr/bin/python3.14 (found version "3.14.7") found components: Interpreter
-- The following tools and libraries have been found and configured:
* ZLIB
* MPI
* OpenMP
* Git
* Python3
-- <<< Build configuration >>>
LAMMPS Version: 2026.9.30.99 patch_30Sep2026-29-g9a2b245af5
Operating System: Linux Fedora 43
CMake Version: 3.31.11
Build type: RelWithDebInfo
Install path: /home/user/.local
Generator: Unix Makefiles using /usr/bin/gmake
-- Enabled packages: <None>
-- <<< Compilers and Flags: >>>
-- C++ Compiler: /usr/bin/c++
Type: GNU
Version: 15.3.1
C++ Standard: 17
C++ Flags: -O2 -g -DNDEBUG
Defines: LAMMPS_SMALLBIG;LAMMPS_MEMALIGN=64;LAMMPS_JPEG;LAMMPS_PNG
Options: -ffast-math;-march=native
-- <<< Linker flags: >>>
-- Executable name: lmp
-- Static library flags:
-- <<< MPI flags >>>
-- MPI_defines: MPICH_SKIP_MPICXX;OMPI_SKIP_MPICXX;_MPICC_H
-- MPI includes: /usr/include/mpich-x86_64
-- MPI libraries: /usr/lib64/mpich/lib/libmpicxx.so;/usr/lib64/mpich/lib/libmpi.so;
-- Configuring done (2.2s)
-- Generating done (0.0s)
-- Build files have been written to: /home/user/lammps/build
Running cmake again with the same -S and -B flags will
reload the settings from the previous run, which are stored in the file
CMakeCache.txt in the build folder. This means, that one can modify
an existing configuration by re-running CMake, but only needs to provide
flags indicating the desired change, everything else will be retained.
One can also mix compilation and configuration, i.e. start with a
minimal configuration and then, if needed, enable additional features
and recompile.
Note
Using only -B build without -S cmake will not work for
LAMMPS, since CMake then assumes the current working directory to be
the source folder, and the top-level LAMMPS folder has no
CMakeLists.txt file. Alternatively, CMake can be given the path
to an existing build folder as its only argument, e.g. cmake
build.
The steps above will NOT compile the code. The compilation is
started in a portable fashion with cmake --build build (see
below).
TUI version
For the text mode UI CMake program the basic principle is the same.
You start the command ccmake -S cmake -B build in the top-level
folder. This will show you the initial screen with the empty
configuration cache:
Page 0 of 1
EMPTY CACHE
EMPTY CACHE:
Keys: [enter] Edit an entry [d] Delete an entry CMake Version 3.31.8
[l] Show log output [c] Configure
[h] Help [q] Quit without generating
[t] Toggle advanced mode (currently off)
Now you type the ‘c’ key to run the configuration step. That will do a first configuration run and show the output with the summary at the end (you can scroll up and down with the arrow keys):
Generator: Unix Makefiles using /usr/bin/gmake
Enabled packages: <None>
<<< Compilers and Flags: >>>
-- C++ Compiler: /usr/bin/c++
Type: GNU
Version: 11.5.0
C++ Standard: 17
C++ Flags: -O2 -g -DNDEBUG
Defines:
LAMMPS_ZLIB;LAMMPS_SMALLBIG;LAMMPS_MEMALIGN=64;LAMMPS_OMP_COMPAT=4;LAMMPS_GZIP
C compiler: /usr/bin/cc
Type: GNU
Version: 11.5.0
C Flags: -O2 -g -DNDEBUG
<<< Linker flags: >>>
Executable name: lmp
Static library flags:
<<< MPI flags >>>
-- MPI_defines: MPICH_SKIP_MPICXX;OMPI_SKIP_MPICXX;_MPICC_H
-- MPI includes: /usr/include/mpich-x86_64
-- MPI libraries:
/usr/lib64/mpich/lib/libmpicxx.so;/usr/lib64/mpich/lib/libmpi.so;
Configuring done (2.5s)
Configure produced the following output
CMake Version 3.31.8
Press [e] to exit screen
You exit the summary screen with ‘e’ and now see the main screen with detected options and settings:
Page 1 of 6
BUILD_DOC *OFF
BUILD_LAMMPS_GUI *OFF
BUILD_MPI *ON
BUILD_OMP *ON
BUILD_SHARED_LIBS *OFF
BUILD_TOOLS *OFF
CMAKE_BUILD_TYPE *RelWithDebInfo
CMAKE_CXX_EXTENSIONS *OFF
CMAKE_INSTALL_PREFIX */home/user/.local
CMAKE_POSITION_INDEPENDENT_COD *ON
ENABLE_TESTING *OFF
FLATPAK_BUILDER *FLATPAK_BUILDER-NOTFOUND
FLATPAK_COMMAND */usr/bin/flatpak
GZIP_EXECUTABLE */usr/bin/gzip
LAMMPS_CXX_COMPILER_NAME *c++
LAMMPS_INSTALL_RPATH *OFF
LAMMPS_LONGLONG_TO_LONG *OFF
LAMMPS_MEMALIGN *64
LAMMPS_SIZES *smallbig
MINGW_CMAKE *MINGW_CMAKE-NOTFOUND
MINGW_CXX *MINGW_CXX-NOTFOUND
PKG_ADIOS *OFF
PKG_AMOEBA *OFF
BUILD_DOC: Build LAMMPS HTML documentation
Keys: [enter] Edit an entry [d] Delete an entry CMake Version 3.31.8
[l] Show log output [c] Configure
[h] Help [q] Quit without generating
[t] Toggle advanced mode (currently off)
You can now make changes by moving up and down with the arrow keys of the keyboard and modify entries. For on/off settings, the enter key will toggle the state. For others, hitting enter will allow you to modify the value and you commit the change by hitting the enter key again or cancel using the escape key. All “new” settings will be marked with a star ‘*’ and for as long as one setting is marked like this, you have to re-run the configuration by hitting the ‘c’ key again, sometimes multiple times unless the TUI shows the word “generate” next to the letter ‘g’ and by hitting the ‘g’ key the build files will be written to the folder and the TUI exits. You can quit without generating build files by hitting ‘q’.
GUI version
For the graphical CMake program the steps are similar to the TUI
version. You can type the command cmake-gui -S cmake -B build in
the top-level folder. The program will then start with an empty
configuration cache:
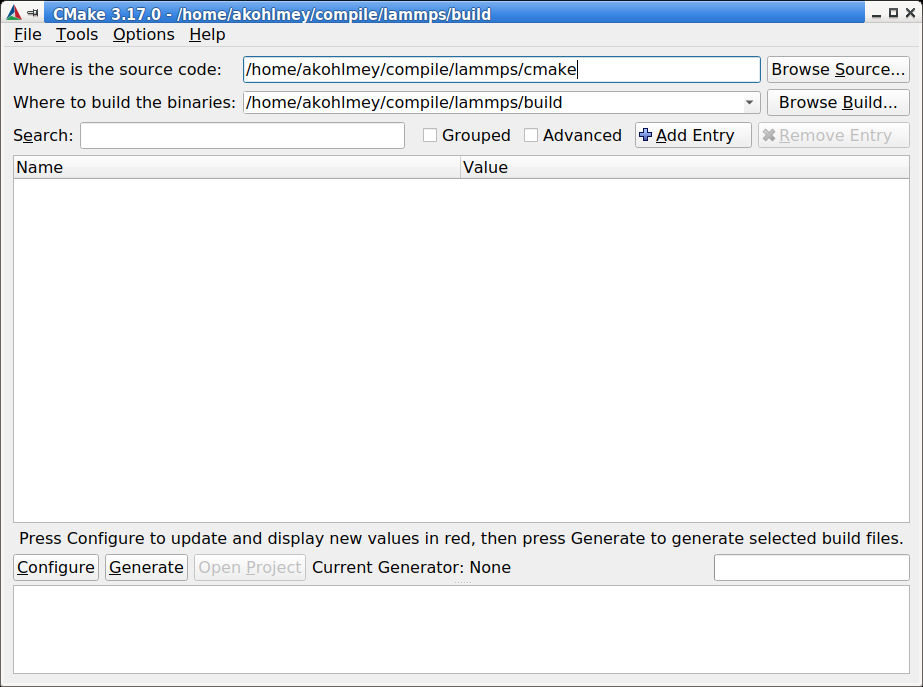
Initial cmake-gui screen
On this initial screen, the source folder (1) and the build folder (2) are already set from the command line; they can also be changed by typing in the path or with the “Browse Source…” and “Browse Build…” buttons. Now click on the “Configure” button (3) to start the configuration step. For the very first configuration in a folder, a dialog will appear:
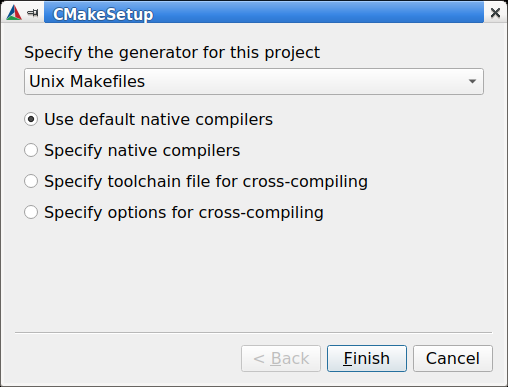
Generator selection in cmake-gui
In this generator selection dialog, you can select the desired build
tool from a drop-down list (1),
e.g. “Unix Makefiles” for using make or “Ninja” for using the
Ninja build tool, and how the compilers are
selected (2). Stick with the default “Use default native compilers” and
click on “Finish” (3). When the configuration is complete, you will see
the options screen with all new settings highlighted in red:
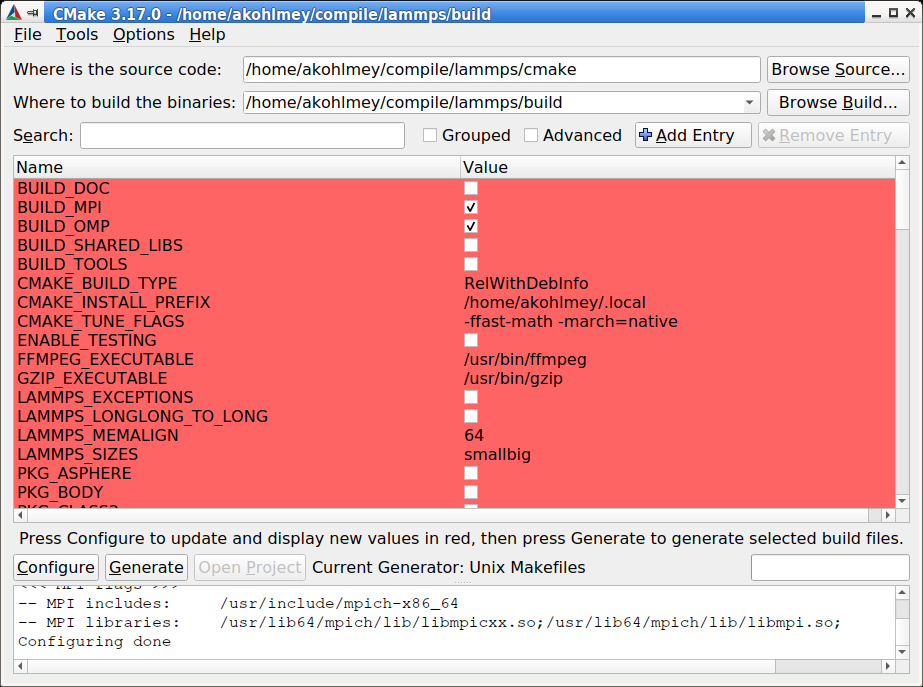
Options screen of cmake-gui
On the options screen, you can type part of a name into the “Search”
field (1) to show only matching settings, e.g. PKG_ to list the settings for all optional
packages. Settings are changed by clicking on a check box (2) for
on/off settings, or by double-clicking on a value to edit it. Click on
“Configure” (3) again after making changes, until no more settings are
highlighted in red, and then click on “Generate” (4) to write out the
build files. You can exit the GUI from the “File” menu or hit
“ctrl-q”.
Setting options
Options that enable, disable or modify settings are modified by setting
the value of CMake variables. This is done on the command-line with the
-D flag in the format -D VARIABLE=value, e.g. -D
CMAKE_BUILD_TYPE=Release or -D BUILD_MPI=on. Such CMake variables
can have boolean values (on/off, yes/no, or 1/0 are all valid) or are
strings representing a choice, or a path, or are free format. If the
string would contain whitespace, it must be put in quotes, for example
-D CMAKE_CXX_FLAGS="-O3 -Wall -ftree-vectorize -ffast-math".
CMake variables fall into two categories: 1) common CMake variables that are used by default for any CMake configuration setup and 2) project specific variables, i.e. settings that are specific for LAMMPS. Also CMake variables can be flagged as advanced, which means they are not shown in the text mode or graphical CMake program in the overview of all settings by default, but only when explicitly requested (by hitting the ‘t’ key or clicking on the ‘Advanced’ check-box).
Some common CMake variables
Variable |
Description |
|---|---|
|
root folder of the install location for |
|
set or remove runtime path setting from binaries for |
|
controls compilation options:
one of |
|
if set to |
|
name/path of the compilation command (default depends on -G option, usually |
|
if set to |
|
C compiler to be used for compilation (default: system specific, |
|
C++ compiler to be used for compilation (default: system specific, |
|
Fortran compiler to be used for compilation (default: system specific, |
|
tool to launch the C++ compiler, e.g. |
|
if set to |
Some common LAMMPS specific variables
Variable |
Description |
|---|---|
|
build LAMMPS with MPI support (default: |
|
build LAMMPS with OpenMP support (default: |
|
compile some additional executables from the |
|
include building the HTML format documentation for packaging/installing (default: |
|
compile and enable the unit tests (default: |
|
download large potential files that are not included in the source distribution (default: |
|
when set to |
|
select which FFT library to use: |
|
select which FFT library to use in KOKKOS package styles: |
|
select whether to use single precision FFTs (default: |
|
whether to support JPEG format in dump image (default: |
|
whether to support PNG format in dump image (default: |
|
whether to support generating movies with dump movie (default: |
|
whether to use the zlib library for compression (default: |
Enabling or disabling LAMMPS packages
The LAMMPS software is organized into a common core that is always
included and a large number of add-on packages that
have to be enabled to be included into a LAMMPS executable. Packages
are enabled through setting variables of the kind PKG_<NAME> to
on and disabled by setting them to off (or using yes,
no, 1, 0 correspondingly). <NAME> has to be replaced by
the name of the package, e.g. MOLECULE or EXTRA-PAIR.
Using presets
Since LAMMPS has a lot of optional features and packages, specifying
them all on the command-line can be tedious. Or when selecting a
different compiler tool chain, multiple options have to be changed
consistently and that is rather error prone. Or when enabling certain
packages, they require consistent settings to be operated in a
particular mode. For this purpose, we are providing a selection of
“preset files” for CMake in the folder cmake/presets. They
represent a way to pre-load or override the CMake configuration cache by
setting or changing CMake variables. Preset files are loaded using the
-C command-line flag. You can combine loading multiple preset files or
change some variables later with additional -D flags. A few examples:
cmake -S cmake -B build -C cmake/presets/basic.cmake -D PKG_MISC=on
cmake -S cmake -B build -C cmake/presets/clang.cmake -C cmake/presets/most.cmake
cmake -S cmake -B build -C cmake/presets/basic.cmake -D BUILD_MPI=off
The first command will install the packages GRAPHICS, KSPACE,
MANYBODY, MOLECULE, and RIGID from the preset file and the
MISC package from the explicit variable definition. The second
command will first switch the compiler tool chain to use the Clang
compilers and install a large number of packages that are not depending
on any special external libraries or tools and are not very unusual.
The third command will enable the same five packages as the first
command and then enforce compiling LAMMPS as a serial program (using the
MPI STUBS library).
It is also possible to do this incrementally.
cmake -S cmake -B build -C cmake/presets/basic.cmake
cmake -S cmake -B build -D PKG_MISC=on
will achieve the same final configuration as in the first example above.
In this scenario it is particularly convenient to do the second
configuration step using either the text mode or graphical user
interface (ccmake or cmake-gui).
Note
Using a preset to select a compiler package (clang.cmake,
gcc.cmake, intel.cmake, oneapi.cmake, nvhpc.cmake, or
pgi.cmake) is an exception to the mechanism of updating the
configuration incrementally, as they will trigger a reset of cached
internal CMake settings and thus reset settings to their default
values.
Compilation and build targets
The actual compilation will be started by running the selected build
command (on Linux this is by default make, see below how to select
alternatives). The portable command cmake --build build will adapt
to whatever the selected build command is. By default, make
compiles only one source file at a time; to compile multiple files in
parallel, append -j N (or --parallel N) with N being the
number of concurrent compilation tasks. The Ninja build tool (see
below) uses all available CPU cores by default.
When calling the build program, you can also select which “target” is to
be built through appending the --target flag and the name of the
target to the build command. Example: cmake --build build --target
lmp. The following abstract targets are available:
Target |
Description |
|---|---|
|
build “everything” (default) |
|
build the LAMMPS library |
|
build the LAMMPS executable (and the library, if needed) |
|
build the HTML documentation (if configured) |
|
install all target files into folders in |
|
run the unit tests (if configured with |
|
remove all generated files |
Instead of the install and test targets, you can also use the
commands cmake --install build and ctest --test-dir build,
respectively. The ctest command offers more options to select which
tests to run and how to report the results.
Choosing generators
While CMake usually defaults to creating makefiles to compile software
with the make program, it supports multiple alternate build tools
(e.g. ninja-build which tends to be faster and more efficient in
parallelizing builds than make) and can generate project files for
some integrated development environments (IDEs) like Visual Studio or
Xcode. This is selected with the -G flag when a build folder is
configured for the first time, e.g. -G Ninja; see the section on
faster compilation with Ninja and ccache for more
details. The list of available options can be seen at the end of the
output of cmake --help. For example, on Linux the main generators
are:
Generators

The following generators are available on this platform (* marks default):
  Green Hills MULTI            = Generates Green Hills MULTI files
                                 (experimental, work-in-progress).
* Unix Makefiles               = Generates standard UNIX makefiles.
  Ninja                        = Generates build.ninja files.
  Ninja Multi-Config           = Generates build-<Config>.ninja files.
  Watcom WMake                 = Generates Watcom WMake makefiles.
The list also contains entries like “CodeBlocks - Ninja” or “Eclipse CDT4 - Unix Makefiles” that generate project files for some other IDEs. These “extra generators” are marked as deprecated since CMake version 3.27 and should not be used anymore.
Instead, many current IDEs and code editors can use the CMake configuration directly:
Visual Studio Code with the “CMake Tools” extension: open the top-level LAMMPS folder and set the
cmake.sourceDirectorysetting to${workspaceFolder}/cmake, since theCMakeLists.txtfile is not in the top-level folder.Qt Creator: open the file
cmake/CMakeLists.txtas a project.CLion: open the file
cmake/CMakeLists.txtas a project.Visual Studio: see the page on building LAMMPS on Windows.
Code editors that support the language server protocol (e.g. through
the clangd program) can provide code navigation and completion
based on a compile_commands.json file, which is written to the build
folder when configuring with -D CMAKE_EXPORT_COMPILE_COMMANDS=on.