
10.6.5. LAMMPS GitHub tutorial
written by Stefan Paquay, updated in 2026 by Axel Kohlmeyer
This document describes how to use git and GitHub to contribute changes or additions you have made to LAMMPS to the official LAMMPS distribution. Contributions to LAMMPS are submitted as pull requests on GitHub, where they are automatically tested and reviewed by the LAMMPS developers before they are included. For more information on the requirements to have your code included into LAMMPS please see this page.
This tutorial is meant for people with little or no experience with git
and GitHub. It uses the git command-line program for all steps on
your local machine and the GitHub web interface for all steps that need
to be done on the GitHub website. The git book is a good resource to learn more about git.
Preparations
Create a GitHub account
First of all, you need a GitHub account. Go to GitHub and click on the “Sign up” button to create one.
Install and configure git
You need the git program installed on your local machine. On
Linux and macOS it is often already installed, otherwise it can be
installed with the package manager (e.g. sudo apt install git on
Debian and Ubuntu). On Windows, we recommend to use git from within the
Windows Subsystem for Linux. Before using git for
the first time, set your name and e-mail address, which will be recorded
with every change (commit) you make:
git config --global user.name "Your Name"
git config --global user.email "you@example.com"
Set up access to GitHub with SSH keys
To upload (“push”) changes to GitHub, git has to authenticate you.
GitHub does not accept your account password for that. The simplest
way for use with the git command is an SSH key. Create one with:
ssh-keygen -t ed25519 -C "you@example.com"
and accept the default file location. Then display the public part of the key with:
cat ~/.ssh/id_ed25519.pub
Copy the output and add it to your GitHub account: click on your profile picture in the top right corner of the GitHub website, select “Settings”, then “SSH and GPG keys”, then “New SSH key”, paste the key, and click on “Add SSH key”. Please see the GitHub documentation on SSH keys for more details.
Note
Alternatively, you can use the GitHub command-line tool and run gh auth login, which can also
set up git to authenticate to GitHub (see below).
Forking the repository
You cannot upload changes directly to the official LAMMPS repository. Instead you first create your own copy of it on GitHub, a so-called fork. Go to the LAMMPS repository on GitHub and click on the “Fork” button (1):
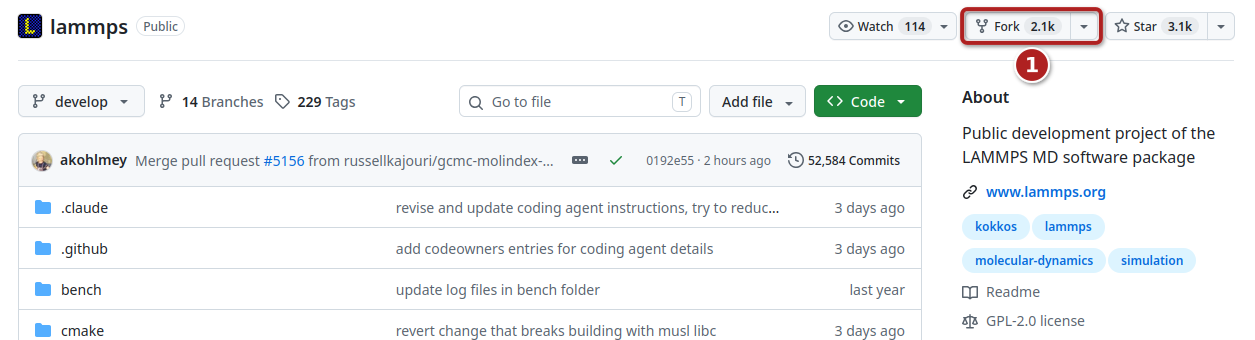
The “Fork” button on the LAMMPS GitHub page
On the next page, keep the default settings and click on “Create fork” (1). The option “Copy the develop branch only” (2) should remain selected, since all contributions to LAMMPS must be based on the develop branch:
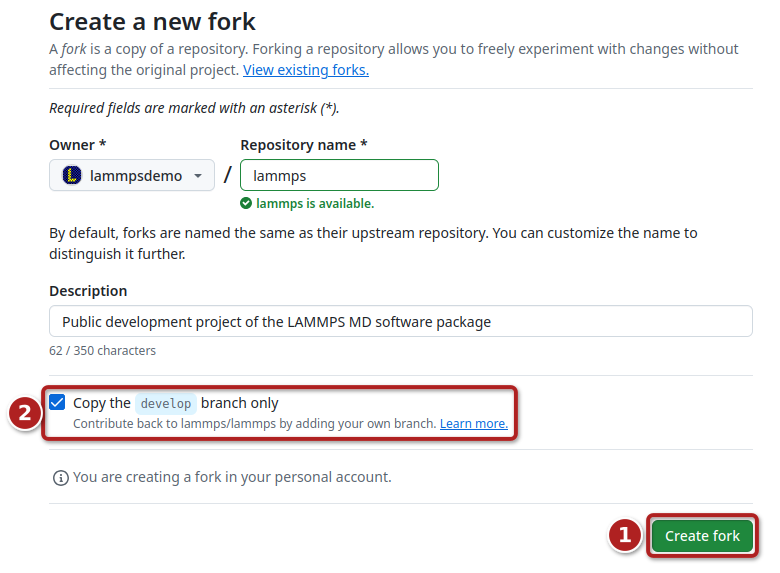
Creating a fork of the LAMMPS repository
This creates a fork of the LAMMPS repository under your GitHub account,
e.g. https://github.com/<your user name>/lammps. You can make
changes in this fork and then submit a pull request asking the LAMMPS
developers to include them into the official LAMMPS repository.
Working with your fork on your local machine
Clone your fork
Next you create a local copy (a clone) of your fork on your machine. On the GitHub page of your fork, click on the “Code” button (1), select “SSH” (2), and copy the URL (3):
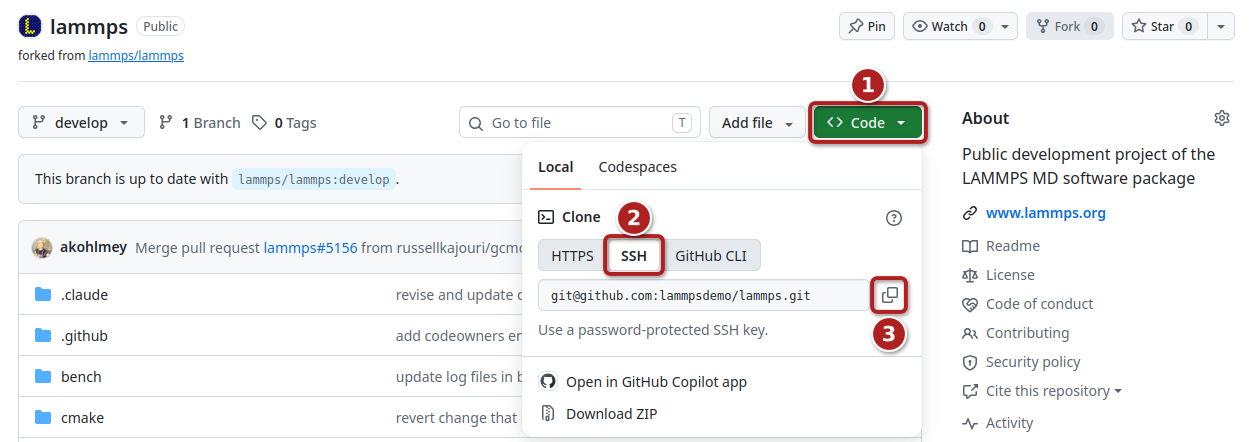
Copying the URL of your fork
Then clone the repository and change into the new folder:
git clone git@github.com:<your user name>/lammps.git
cd lammps
To be able to get the latest changes from the official LAMMPS repository later, add it as an additional remote repository named “upstream”:
git remote add upstream https://github.com/lammps/lammps.git
The command git remote -v should now list “origin” (your fork) and
“upstream” (the official repository).
Create a feature branch
All changes for one specific feature or bug fix are made in a separate feature branch, which contains only the modifications relevant to that feature, e.g. for a new fix only its source and header files and its documentation. For every new feature or bug fix, create a new branch from the latest version of the develop branch of the official repository. In this example the branch is called “my-new-feature”:
git fetch upstream
git switch --no-track -c my-new-feature upstream/develop
The --no-track flag is important: without it, git remembers the
develop branch of the official repository as the counterpart of your
new branch, and depending on your git settings, a later git push
may then try to upload your changes to the develop branch of your
fork instead of a new branch.
Note
Do not make changes in the develop branch of your fork, and never use the same branch for unrelated changes. This will make it much easier to keep your changes separate and to get them included into LAMMPS.
Make and commit your changes
Now make your changes, compile and test LAMMPS, and check that your
changes follow the requirements for contributions and the programming style.
The command git status shows which files are modified or new, and
git diff shows the changes in detail. Then add the modified and new
files to the next commit and record the commit with a short message that
explains the change:
git add src/EXTRA-FIX/fix_my_new_feature.cpp src/EXTRA-FIX/fix_my_new_feature.h
git add doc/src/fix_my_new_feature.rst
git commit -m "add fix my/new/feature"
Warning
Do not use git commit -a (or git add -A). These will
automatically include all modified and new files and that is
rarely the behavior you want. It can easily lead to accidentally
adding unrelated and unwanted changes into the repository. Instead
it is preferable to explicitly use git add, git rm, and git
mv for adding, removing, and renaming individual files,
respectively, and then git commit to finalize the commit.
Carefully check all pending changes with git status before
committing them. If you find doing this on the command-line too
tedious, consider using a GUI, for example git gui (on some Linux
distributions it may be required to install an additional package to
use it).
You can make as many commits in your branch as you like.
Upload your changes to GitHub
To upload (“push”) your branch to your fork on GitHub for the first time, use:
git push -u origin my-new-feature
After that, a plain git push will upload any additional commits in
this branch.
Filing a pull request
So far, all changes were made only in your copies of LAMMPS. To ask for your changes to be included into the official LAMMPS version, you need to file a pull request. After pushing a branch, GitHub shows a banner on the page of your fork (and the LAMMPS repository) with a “Compare & pull request” button (1):
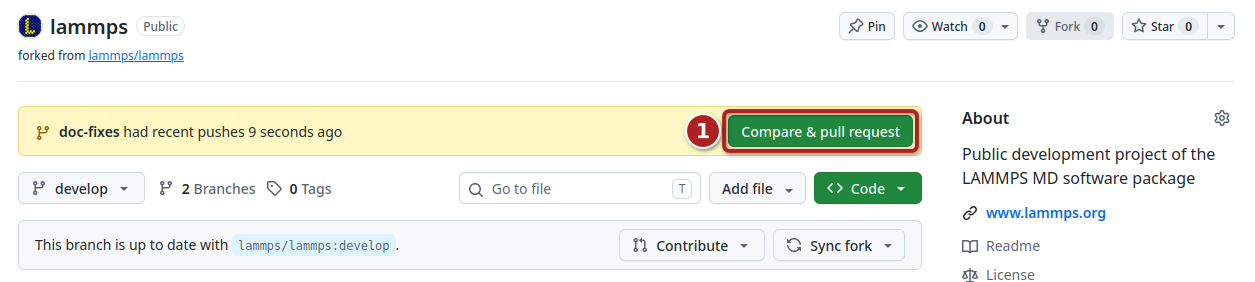
Starting a new pull request
This opens the form for a new pull request:
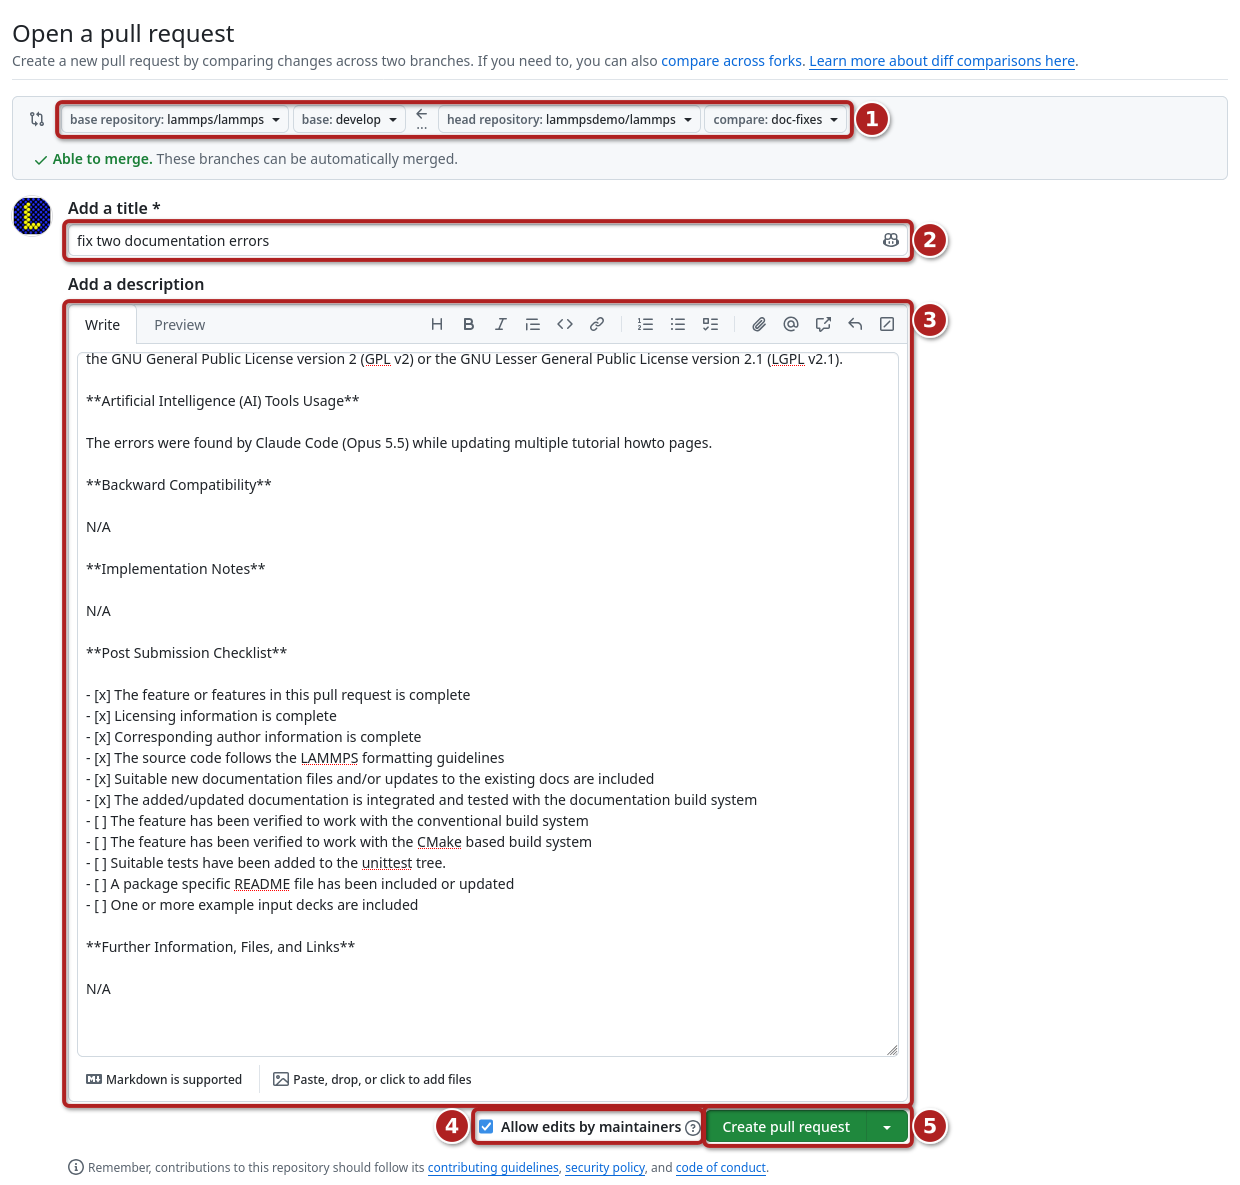
Creating a pull request
Please check and fill in the following:
The pull request must be from the feature branch in your fork to the develop branch of the official LAMMPS repository (1).
Give the pull request a short title that describes the change (2).
The description field (3) is pre-filled with a template. Fill in each section and replace the comments with your information. In particular, please state whether and how you used AI tools to create the changes in the “Artificial Intelligence (AI) Tools Usage” section. Do not change or remove the “Licensing” statement.
Leave the check box “Allow edits by maintainers” (4) selected. This allows the LAMMPS developers to make small changes or corrections directly in your branch, which can speed up the inclusion of your pull request significantly.
Click on “Create pull request” (5). If your changes are not yet complete, but you want to show them to the LAMMPS developers or see the results of the automated tests, select “Create draft pull request” from the drop-down menu instead. You can later mark a draft pull request as “Ready for review”.
After filing a pull request
Automated checks
After filing the pull request, several automated checks are started. They test, for example, whether your changes compile on several platforms and with different settings, pass the unit tests, and follow some of the LAMMPS formatting conventions. The status of these checks is shown at the bottom of the “Conversation” tab of the pull request (1):
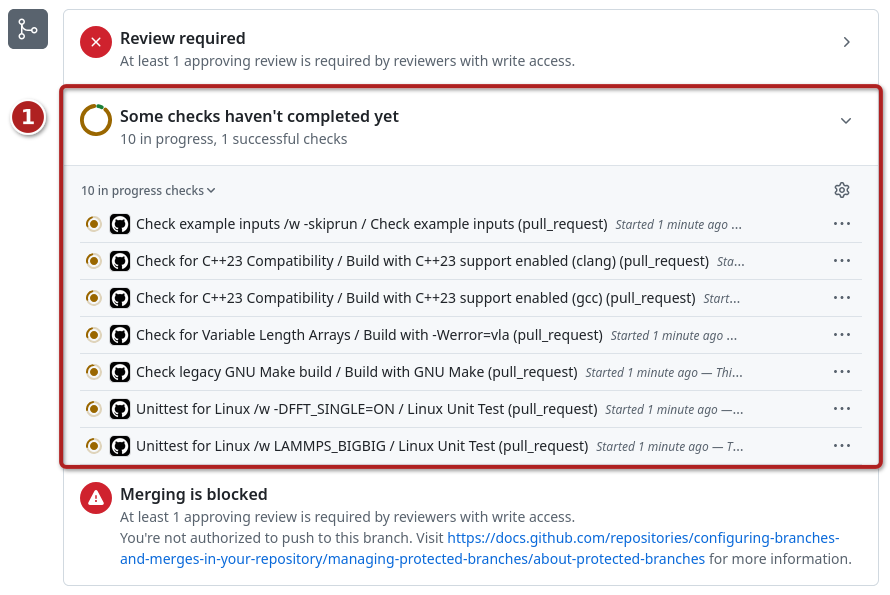
Automated checks of a pull request
If any of the checks are failing, your pull request will not be merged. Click on a failed check (or open the “Checks” tab) to see what went wrong. It is your responsibility to remove the reason(s) for the failed test(s). If you need help with this, please add a comment to the pull request explaining your problem.
Updating a pull request
Any additional commits you push to your feature branch automatically become part of the pull request. After each push, the automated checks are run again. This way you can add changes that you forgot, or that were requested by the LAMMPS developers.
LAMMPS developers may also push changes to your branch (if you allowed edits from maintainers). Thus, before continuing to work on your branch, always update your local copy first with:
git pull
If the develop branch has changed in the meantime in a way that conflicts with your changes, you need to merge those changes into your branch, resolve the conflicts, and push the result:
git fetch upstream
git merge upstream/develop
git push
Note
Please do not use git rebase and git push --force on a branch
for which you have filed a pull request. This rewrites the history
of the branch and can cause problems for others who have already
worked with it.
Reviews, labels, and assignments
Every pull request is reviewed by LAMMPS developers. Some reviewers are requested automatically, since they are associated with the modified files in the .github/CODEOWNERS file. Reviewers and other developers may comment on your changes or request specific changes from you. Please respond to these comments; if requested changes are not addressed, your pull request cannot be merged. Before a pull request can be merged, it has to pass all automated tests and has to be approved by at least two LAMMPS developers with write access to the repository, where merging the pull request counts as one approval.
The reviewers (1), the assigned LAMMPS developer (2), the labels (3), and the milestone (4) of the pull request are shown on the right side of the page:
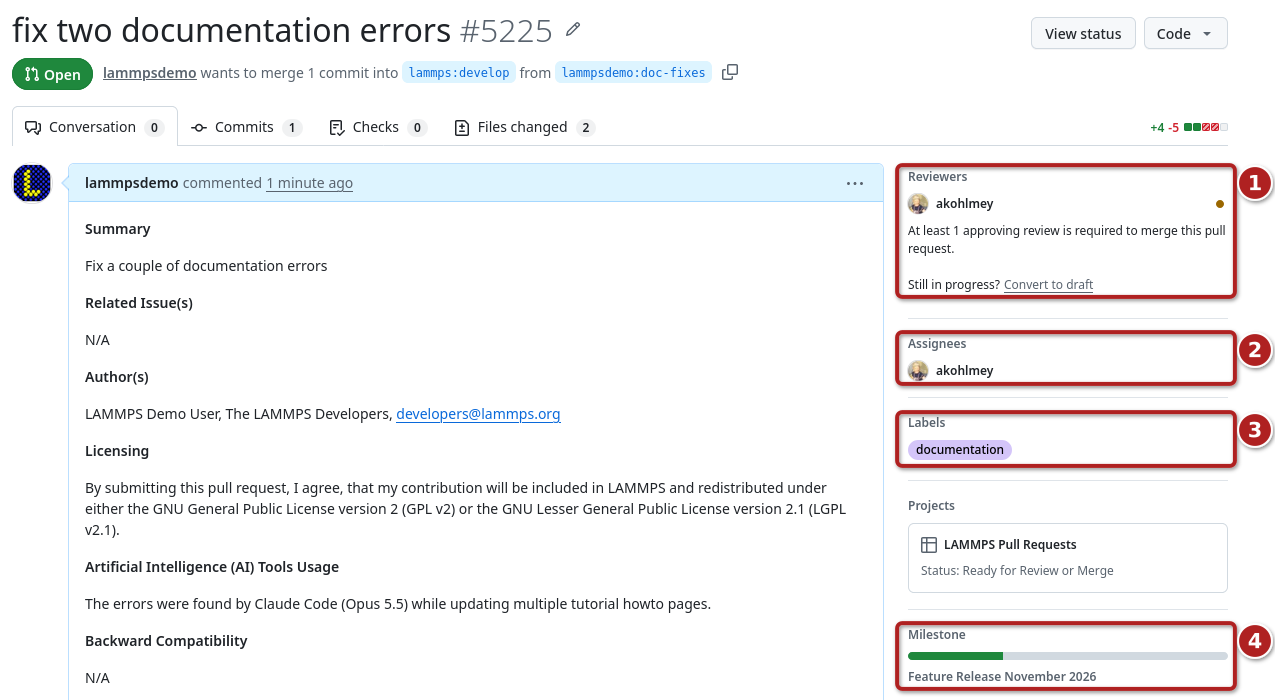
Reviewers, assignee, labels, and milestone of a pull request
LAMMPS developers may assign a pull request to a developer who looks after it and determines what is needed before it can be merged. The milestone indicates the release in which the pull request is planned to be included. The labels are mostly for bookkeeping purposes, but a few of them are important: needs_work means that the pull request is not complete and changes from you are required, work_in_progress means that changes are still being made (by you or a LAMMPS developer), and ready_for_merge means that the pull request is considered complete and ready to be merged.
Sometimes LAMMPS developers do not push changes to your branch directly,
but instead file a pull request in your fork (a “reverse pull
request”) for you to review. If you agree with the changes, you can
merge them on the GitHub page of that pull request, and then update your
local copy with git pull.
Note
Contributors of new packages or other significant contributions are invited to become LAMMPS project collaborators with “Triage” permissions. This allows them to help with reviewing pull requests and some administrative tasks, but their approvals are informational only.
More details about the processing of pull requests by the LAMMPS developers are in the file doc/github-development-workflow.md.
After the pull request is merged
When everything is fine, a LAMMPS developer will merge your pull request into the develop branch, and the pull request page shows a “Delete branch” button (1). Use it to delete the feature branch from your fork on GitHub, since it is no longer needed:
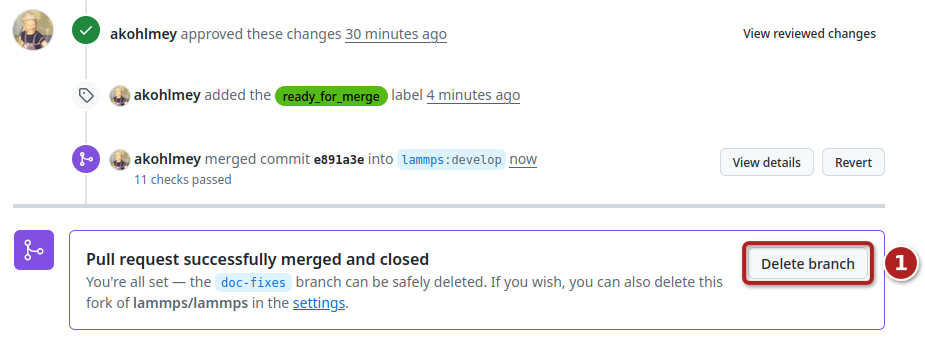
A merged pull request
Then update the develop branch on your local machine and delete the local feature branch:
git switch develop
git pull upstream develop
git branch -d my-new-feature
If you want to keep the develop branch of your fork on GitHub up to
date as well, use the “Sync fork” button on the GitHub page of your
fork, or push the updated local branch with git push origin
develop.
Using the GitHub command-line tool
Many of the steps on the GitHub website can also be done with the
GitHub command-line tool gh, after
logging in to GitHub with gh auth login. Some examples:
gh repo fork lammps/lammps --clone   # create a fork and clone it
gh pr create --draft                 # file a (draft) pull request for the current branch
gh pr checks                         # show the status of the automated checks
gh pr view --web                     # open the pull request in the web browser
Please see the section on the GitHub command-line interface for more examples.
LAMMPS branches and releases
All new features and bug fixes are submitted to the develop branch. In addition, there are several other branches in the LAMMPS repository: the release branch is updated from the develop branch as part of a “feature release”, and stable (together with release) is updated from develop when a “stable release” is made. In between stable releases, selected bug fixes and infrastructure updates are back-ported from the develop branch to the maintenance branch and occasionally merged into stable as an update release.
The release tags follow the pattern “patch_<Day><Month><Year>”, e.g. “patch_10Sep2025”. Stable releases have additional “stable_<Day><Month><Year>” tags, and update releases are tagged with “stable_<Day><Month><Year>_update<Number>”.